Category Archives: Uncategorized

changing the soekris boot order from linux nvram interface

[This may break your toys and doesn’t work. You have been warned.]

So I wanted to change the Soekris on the side of the house to prefer pxe boot so I could reinstall pyramid without needing to take it down to get to the serial console. Of course, to set this setting, you need to get into the serial console. Unless…

The settings are supposedly stored in the nvram so the box will still boot in cases of the bios battery dieing. So I’m valiantly trying to brick a soekris in an effort to maintain my laziness.

Start by making sure you have the /dev/nvram interface. In Pyramid you need to make it:

cd /dev ; ./MAKEDEV nvram

The nvram module will load when you access the device, provided modules.conf contains:

alias char-major-10-144 nvram

Grab a copy of the nvram:

cp /dev/nvram nvram.bin

I used hexdump to check out the nvram. If you’re running pyramid you’ll need to grab the binary. See the package website and grab bsdmainutils-6.1.2ubuntu1 (pyramid currently runs breezy) provided the mirrors are still up (canonical has started taking down breezy mirrors). You can grab hexdump out the deb:


mkdir hexdump-temp ; cd hexdump-temp
ar p ../bsdmainutils_6.1.2ubuntu1_i386.deb | tar xv
cd usr/bin
scp hexdump root@my.soekris:/usr/bin

Soekris 4526 (Metrix Mark I):


sunrise:~# hd nvram.bin
00000000 00 00 00 51 f0 00 01 80 02 00 fc 0f 2f 00 00 00 |...Q......../...|
00000010 00 00 00 80 81 f0 ff 00 00 00 00 00 00 00 00 00 |................|
00000020 05 ee 00 fc 19 00 00 00 00 00 00 00 00 00 00 00 |................|
00000030 00 00 05 28 08 06 0d 22 80 09 00 0c 06 2a 40 58 |...(...".....*@X|
00000040 0f 04 84 11 47 40 00 20 00 00 00 05 00 08 42 00 |....G@. ......B.|
00000050 07 00 c5 20 00 00 02 00 08 02 40 42 01 40 00 02 |... ......@B.@..|
00000060 84 4c 00 10 0b 20 00 34 c3 08 50 00 44 42 91 00 |.L... .4..P.DB..|
00000070 00 20 |. |
00000072

Soekris 4501:


sunrise:~# hexdump -C nvram.orig.4501
00000000 00 00 00 51 f0 00 01 80 02 00 fc 0f 2f 00 00 00 |...Q......../...|
00000010 00 00 00 80 81 f0 ff 00 00 00 00 00 00 00 00 00 |................|
00000020 05 ee 00 fc 19 00 00 00 00 00 00 00 00 00 00 00 |................|
00000030 00 00 00 00 4c 32 0a 41 42 11 81 00 09 24 1d 80 |....L2.AB....$..|
00000040 0d 04 18 03 04 24 00 00 50 84 06 72 81 01 53 34 |.....$..P..r..S4|
00000050 c1 08 88 02 08 80 01 22 49 04 00 00 10 02 01 00 |......."I.......|
00000060 10 49 0a 02 22 04 48 06 07 48 08 25 06 61 00 02 |.I..".H..H.%.a..|
00000070 99 26 |.&|
00000072

In both cases I’m assuming 0x13 – 0x16 controls the boot order. 80 Primary IDE (flash), 81 Secondary IDE, f0 network boot and ff I have no clue.

I copied the file to my laptop and used hexer (vim like hex editing tool) to rewrite those bytes (use r for overwrite) then rewrite the nvram using:

cat nvram.new > /dev/nvram

I rebooted and the box came back up. But I didn’t see any network traffic. I booted up a local 4826 and used the cmos monitor to try to figure it out:


> show

ConSpeed = 19200
ConLock = Enabled
ConMute = Disabled
BIOSentry = Enabled
PCIROMS = Enabled
PXEBoot = Enabled
FLASH = Primary
BootDelay = 5
FastBoot = Disabled
BootPartition = Disabled
BootDrive = 99 FF FF FF
ShowPCI = Enabled
Reset = Hard

> cmosread
Addr CMOS Data

00: 06 00 43 00 19 00 07 19 01 80 26 02 50 80 00 00
10: 00 51 FF 00 01 80 02 00 FC 0F 1F 00 00 00 00 00
20: 00 80 81 F0 FF 00 00 00 00 00 00 00 00 00 05 ED
30: 00 FC 19 00 00 00 00 00 00 00 00 00 00 00 00 00
40: D9 BF FB AE 0C 72 2B 84 9B FE 7B 7F 00 8C 10 05
50: DD EB 5E FE 04 50 14 12 E7 DF 2F 73 A0 9E 42 01
60: FB BB AD 77 0C 3B 40 BA 9B 9C F8 15 89 16 02 40
70: 3D 97 A0 7A 4A 92 F8 24 B8 D9

>

I ‘set BootDrive=99’ to make it stand out, rather than the default ‘set BootDrive=80,81,F0’ and you can see the 80,81,F0 around 0x21-0x23 doesn’t change. So I have no idea now where this data is actually stored.

viewing ms project in linux with ganttproject

I’ve searched for linux software a number of times to open microsoft project files and most of the information has been of the “well, I’ve never tried it variety”.

I downloaded a GanttProject 2.0.4 deb from the merlinux site here and installed it in my typical trusting fashion ( it does dump a ton of shit in /opt/ganttproject, but that’s fine as it’s really an alien’d rpm.).

I downloaded the company project file, started GanttProject and important the MPP via File->Import. Everything looks fine, took 30-40 seconds for everything to stabilize such that I could resize the window and it would adjust, but that’s probably because it’s Java and it was searching for resources to waste or whatever. So it works somewhat at least, which is more than I’ve seen anyone else say.

Hopefully someone will package it. Other than me. In true ubuntu fashion. See bug 123275.

‘open all in tabs’ replaces / closes tabs in firefox

I keep sites grouped in the toolbar in FF and occasionally make the mistake of trying to use ‘open all in tabs’. This closes / replaces what I have open. I’m not sure exactly, there’s a lot of discussion about what it does do and what it should do. There’s a ton of discussion in bug 175124 and bug 258224 about what it should do. If you always remember to middle click on the folder, that works well enough for me. To change the action of open all in tabs however, which you can’t middle click on, change browser.tabs.loadFolderAndReplace to false in about:config (there’s no option in preferences afaik).

text not appearing in ocsng login screen when using firefox

A while back I upgraded my inventory server to apache2/php5 and at some point OCSNG stopped showing the text labels on the login screen and buttons. I assumed it was an issue with the upgrade, which it may well have been caused by indirectly.

Recently ocsng announced OCS Packager, a more reasonable windows agent service packaging utility. I want to build this into the desktop deployment system and I’ve got a deadline coming up on some machines so I came back to dealing with this issue. First, I reinstalled OCSNG but still saw the same issue. I poked around a bit in the apache configs thinking there may be some disconnect when it came to translations but wasn’t sure what I was looking for.

Eventually I tried the site from IE on Server 2003 and it worked fine. Assuming theres an issue with the user agent being passed by firefox, I installed tshark and started comparing the http GETs but they’re pretty hefty. Unfortunately there isn’t a lot of comments in the code and if there where, they’d probably be in French or such. I’ve spent enough time trying to figure it out, so I’m giving up and working around it instead.

Pushing the language appears to work, and I believe it gets saved in the session, it definitely gets saved to the cookie. Use: http://server/ocsreports/?lang=english in your browser and links.

I’ve opened bug 1748676 against OCSNG.

complex lvm on an alternative install of ubuntu (debian-installer)

I’ve been meaning to post my notes on this for a while but I wanted to post some code which needs to be stripped of the proprietary work. At my job, we have a need to do multiple installs a day of ubuntu via the network and require a fairly complex lvm configuration. When done on feisty, first you need to deal with the three minutes it takes to create the lvm devices. This is a bug, check out this post about it.

Partman-auto and partman-lvm-auto configuration recipes are pretty complex to begin with. If you’re not simply formatting the whole disk, it can get really confusing, let alone figuring out the difference between partman and partman-lvm. There’s some sample code out there, but it’s hard to tell when era it’s from. Upon learning that partman-auto wasn’t going to support multiple disks, I started looking for alternatives. Thanks to cjwatson and fjp for pointing me in the right directions at times.

Finding the right hooks was the hard part. debian-installer (or d-i) is the alternative and network (pxe based) installer for ubuntu. It’s very modular and uses anna (the lightweight version of apt) specific udeb (anna’s version of debs) configurations to let d-i know in what order a specific module should be run. Basically what I did was force partman not to run, and have a shell script run instead.

Assuming that you’ve already got a pxe install going with a preseed file, use the following:


d-i preseed/early_command string wget http://server.example.com/ubuntu/config/lvm.sh -P /tmp ; chmod 755 /tmp/lvm.sh ; echo /tmp/lvm.sh installer >> /var/lib/dpkg/info/download-installer.postinst

This will download your script and set it to be executed after the base installer is downloaded. This is important because some of the install system is in the initrd, but a lot of it, partman included, is installed from a udeb after the initrd is loaded. So you can’t just hack partman from inside the initrd.

lvm.sh is a two phase script. the first is run when the base installer is setup, by the earlier call in download-installer.postinst. This phase then sets itself to be run instead of partman, allowing you to create and mount your partitions at the correct time.

Note that you should have your disk mounted as /target by the end of phase 2 as well as have your fstab configured. I’d also recommend running swapon against your swap, but keep in mind that the mkswap currently shipping will only prepare 2GB of swapspace, see bug 119900.

Theres some extra stuff in this script you won’t need. It’s also untested with my companies stuff removed. If having a bunch of lvms named ‘stuffN’ seems stupid, it’s because that’s my way of obfuscating the code so I won’t have someone from work complain. As always, YMMV.


#!/bin/sh
# Manually create LVM configuration
# Partman does not currently support multi-disk lvm
# Designed to be run after download-installer but before partman-base
# This allows us to modify partman-base.postinst after it's been dropped in by anna
# Partman appears to be entirely an external program, removing the call to partman from partman-base.postinst prevents it from running.

case "$1" in
installer)
# we should have d-i downloaded by now.
# partman comes in a udeb from the network so we have to hook here
# and replace the partman-base.postinst file
sed -i 's/partman/\/tmp\/lvm.sh partman/' /var/lib/dpkg/info/partman-base.postinst
logger lvm.sh modified partman-base.postinst
;;
partman)
# do filesystem stuff: detect our config, fdisk, lvms, mount /target
logger lvm.sh partition configuration starting
modprobe dm_mod

# FIXME: This is going to be really dirty to handle our configurations. More work will need to be done later.
# case1: sda: 1171842048 hda: 125056
# case2: sda: 976519168 hda: 58605120
# case3: sda: 732389376 hda:

SIZE_SDA=`sed -n 's/.* \([0-9]*\) sda$/\1/p' < /proc/partitions`
SIZE_HDA=`sed -n 's/.* \([0-9]*\) hda$/\1/p' < /proc/partitions`

echo sda: $SIZE_SDA hda: $SIZE_HDA

# pvcreate filters (ignored by filtering) if the there's a partition table
dd if=/dev/zero of=/dev/sda bs=512 count=1

# check for separate physical boot drive
if [ $SIZE_HDA ] ; then
# we have the boot disk create a primary partition
echo ",,83" | sfdisk /dev/hda


pvcreate -ff -y /dev/sda
BOOT=/dev/hda1
LVM=/dev/sda
else
# no separate boot drive
echo -e ",256,83\n,,8e" | sfdisk -uM /dev/sda

pvcreate -ff -y /dev/sda2
BOOT=/dev/sda1
LVM=/dev/sda2
fi

mke2fs -q $BOOT
vgcreate -s 256M system $LVM

if [ $SIZE_SDA -gt 700000000 ] ; then
COMPLEXFS=1
lvcreate -L 20G -n stuff1 system
lvcreate -L 20G -n stuff2 system
lvcreate -L 8G -n swap system
lvcreate -L 20G -n stuff3 system
lvcreate -L 200G -n stuff4 system
lvcreate -L 200G -n stuff5 system
lvcreate -L 200G -n stuff6 system

for fs in stuff1 stuff2 stuff3 stuff4 stuff5 stuff6 ; do mkfs.reiserfs -q /dev/system/$fs 1>/dev/null; done

else
# FIXME: swap too big for vmware
lvcreate -L 8G -n swap system
lvcreate -l `pvdisplay | sed -n 's/Free PE \([0-9]*\)/\1/p'` -n config1 system

mkfs.reiserfs -q /dev/system/stuff1 1>/dev/null
fi

# setup common swap
mkswap /dev/system/swap
swapon /dev/system/swap

# Create directory structure
mkdir /target
mount /dev/system/stuff11 /target -treiserfs
mkdir /target/boot
mount $BOOT /target/boot -text2
if [ $COMPLEXFS ] ; then
mkdir -p /target/stuff2
mkdir -p /target/stuff3
mkdir -p /target/stuff4
mount /dev/system/stuff2 /target/stuff2
fi

# Create fstab
mkdir /target/etc
echo \# /etc/fstab: static file system information. > /target/etc/fstab
echo \# >> /target/etc/fstab
echo "# " >> /target/etc/fstab
echo $BOOT /boot ext2 defaults 1 2 >> /target/etc/fstab
echo /dev/system/stuff1 / reiserfs acl,user_xattr 1 1 >> /target/etc/fstab
if [ $COMPLEXFS ] ; then
echo /dev/system/stuff2 /stuff2 reiserfs acl,user_xattr 1 2 >> /target/etc/fstab
echo /dev/system/stuff3 /stuff3 reiserfs acl,user_xattr 1 2 >> /target/etc/fstab
echo /dev/system/stuff4 /stuff4 reiserfs acl,user_xattr 1 2 >> /target/etc/fstab
fi
echo /dev/system/swap none swap sw 0 0 >> /target/etc/fstab
echo proc /proc proc defaults 0 0 >> /target/etc/fstab

# Secret udev rules hack for network cards
mkdir -p /target/etc/udev/rules.d
echo \# on board e100 > /target/etc/udev/rules.d/50-network.rules
echo KERNELS==\"0000:00:06.0\", NAME=\"eth2\" >> /target/etc/udev/rules.d/50-network.rules
echo \# on board tg3 \(2x1000\) >> /target/etc/udev/rules.d/50-network.rules
echo KERNELS==\"0000:02:09.0\", NAME=\"eth0\" >> /target/etc/udev/rules.d/50-network.rules
echo KERNELS==\"0000:02:09.1\", NAME=\"eth1\" >> /target/etc/udev/rules.d/50-network.rules

;;
*)
echo $0: This script is destructive and should only be run as part of the debian-installer process
;;
esac

Sharepoint (SPS) 2.0 and Quick Launch

When I started my new job there was much talk about Sharepoint and I figured, “well, a marketable skill”. Actually, working with Sharepoint has been more like being the guy that has to pump the portable bathrooms at outdoor venues.

The main quicklaunch toolbar has needed updating for sometime. If you open a Document Library and choose “Modify settings and columns” on the left theres an option to display the library on the Quick Launch bar. I couldn’t find this setting for the new sites however. There’s a lot of talk on the net about replacing the toolbar. Because, well, it sucks. There’s also a lot of talk about “Look and Feel” which appears to be an SPS 3.0 option.

The shortest path to getting this updated and getting on with my life turned out to be opening Frontpage. Pointing it at the sharepoint site from File->Open. Clicking in an existing row on the quick launch bar and inserting a couple rows, then adding links to the new sites. Then save it and you’re done. I’m assuming this is WebDav and it all worked because I authenticated behind the scenes with my domain credentials. I really don’t want to know, I’m glad it’s working and I can get back to work. Annoyingly, I spent more time looking for the option to add sites to the quick launch bar over the last few months than it took me to actually do the work.

svn / ldap / apache / active directory

We do the WebDAV SVN/Apache bit around these parts. In the apache config there’s the bit:

AuthLDAPURL ldap://dc.example.com/CN=Users,DC=example,DC=com?sAMAccountName?one?(objectClass=user)

This works with a flat tree, but I recently moved things around and needed the tree to be searched so we moved to:

AuthLDAPURL ldap://dc.example.com/DC=example,DC=com?sAMAccountName?sub?(objectClass=user)

Noting that we’re not looking in the Users folder anymore, and ‘one’ is now ‘sub’.

Unfortunately, everything broke when the change was made so I played around on it for a bit on another box and found that the ldap client was getting confused due to referrals being provided by the ldap server (active directory).

Notes in bug #26538 point to using the global catalog instead on port 3268. There was work on building an option to ignore referrals but it looks like it didn’t get made.

Instead, I put “REFERRALS off” in /etc/openldap/ldap.conf. Note that I tried /etc/ldap.conf and it didn’t work, and I didn’t bother researching the difference.

It may be worth noting that I saw some references to the DNS Zone application partitions when I used wireshark to monitor the ldap requests and that led me down this road.

Creating DEBs from scratch

If you’ve ever made a deb, you’ve likely noticed the confusing file of helper apps and scripts. I initially fell back on just using dpkg-deb. For a current project though, I needed to make the deb completely from scratch.

I’m attempting to make a deb for Oracle Database. The touted “Oracle Universal Installer” is a huge pile of shit, that is, a X based java program. Even when I run it in silent mode with a scripted response file, it still tends to spawn itself out as a new parent so I can’t keep my scripts around it. My solution has become to perform a scripted install on a box, then package the completed install (the whole whopping 1.5GB of it) into a deb. I don’t want to move the 1.5GB binary tree into my deb build folder, so I decided to create the deb by hand. This is simple up to a point.

Of all the discussion out there about the deb format, the best reference is simply the deb man page. I couldn’t find much in the Debian Policy Manual or New Maintainers Guide.

A deb is an ‘ar’ archive containing debian-binary, control.tar.gz and data.tar.gz.

These files should be in this order. debian-binary should contain a single line with the text “2.0” to specify the new deb version. control.tar.gz should be a tar file, gzipped, containing the control file and other scripts as specified in the the aforementioned guides. data.tar.gz should contain the files you want the package to install.

So:

echo “2.0” > debian-version
ar r newpackage.deb debian-version control.tar.gz data.tar.gz

Control.tar.gz should be created from within your standard DEBIAN directory, ie:

cd DEBIAN
tar -cvzf ../control.tar.gz .

Data.tar.gz should be created at the root of a file system in the same manner, obviously only including the paths you want to be included.

I’m still unable to please all the deb packages with this format. There was discussion years back amongst debian developers to stick to the “bsd” format for ar and not use the “gnu” format which supported spaces in filenames by adding a slash to the end of the filename as a terminator in the format. Best I can tell, OpenBSD and FreeBSD have since switched to using gnu binutils as well, so I can’t even find source for a reasonable modern version of non-gnu ar to compile.

Apt has it’s own ar code in the source that does things it’s way.

All of this was done to make debian packaging portable. Granted, the idea was more that you could access debian packages anywhere, rather than create them. Other than using sed or such to go in and modify the deb afterwards, I’m out of ideas.

Update: My Sed-foo is poor, but I tried to get sed to match the old bsd style for me with: sed -i ‘s/^\([A-Za-z.-]*\)\//\1 /’ file.deb, searching for text (filename with a slash) at the beginning of a line and replacing the slash with a space. This worked as far as apt-extracttemplates & ar was concerned but as was to be expected, somewhere within the data.tar.gz was corruption as a result. I’m sure a better regex would work.

Instead of spending more time on this, I went to the dpkg world. After the oracle software is installed, I tar the folders I want and pipe that back into tar in the build directory (ie cd / ; tar -c /apps/stuff /opt/stuff /etc/configstuff | tar -xC /home/build/build ; cd /home/build ; dpkg-deb -b build . ). Looks like it works okay. The real tests begin soon as the developers start using the package.

ubuntu feisty netboot / alternatives install with lvm bug 105623

Ubuntu LP Bug 105623 has to do with the lvm device nodes taking a while to show up when doing a network / alternatives install with ubuntu. It appears that lvm waits to sync with udev and udev doesn’t do anything. Eventually lvm times out and makes the device nodes, but it’s something like three minutes later. This happens for every logical volume. If you’re dealing with many logical volumes, this is annoying. If you deal with many logical volumes every day, this is impossible.

Ubuntu splits devmapper into two packages: dmsetup and libdevmapper. The installer (debian-installer) uses udebs and anna instead of debs and apt (because their more lightweight). If you check out the different between dmsetup-udeb_1.02.08-1ubuntu10_amd64.udeb and dmsetup-udeb_1.02.18-1ubuntu6_amd64.udeb in which this bug is supposed to be fixed, a udev rule has been added (/etc/udev/rules.d/65-dmsetup.rules). I tried backporting these packages to my edgy install (this fix is only in gutsy as of this writing) as I didn’t think anyone else was going to. On the plus side I’ve learned a bit about d-i, but it’s taken quite a bit of time as there doesn’t appear to be much in the way of official documentation.

I ended up taking this file and building it into the feisty netboot initrd. However, it didn’t appear to fix anything. Upon closer examination it runs “dmsetup export” which isn’t in my feisty documentation, so I think it’s something new. I couldn’t find a sane way to backport all of libdevmapper without redoing the repository, which would mean resigning the release files and adding keys to the keyring in the initrd, or removing the keyring from the initrd. I wanted to avoid manging my mirror as much as possible. However /etc/udev/rules.d/25-dmsetup.rules on a functional feisty box appears to do something, so I built that into the initrd, and the problems were fixed (LVM creation is once again immediate).

Note that initially I was using preseed/run to download/run a script (before the udebs are unpacked) to install this file but I didn’t feel like udev was reading it as I didn’t have udevcontrol to send udev the read_rules command. While playing around and running udevd with –verbose, it looked like it would periodically recheck for rules, but I’m not going to take the time to test this. All I’m saying is that wgetting 25-dmsetup.rules to /etc/udev/rules.d with -P would probably work and be easier than recreating the initrd.

Of course, this “works for me”, YMMV. For the trusting, my patched feisty initrd is here.

multicast bridging on openbsd to monitor ospf

I’ve been working on getting ospf setup between a Cisco PIX 515E and a Netgear 7324 (Which I despise by the way). It just wasn’t working so I stopped working on it last night, with intentions to setup a sniffing bridge today.

For whatever reason, www.openbsd.org is giving 403s right now. It turns out openbsd.org works, but regardless I grabbed openbsd 4.1 from a mirror and threw it on the pxe server. Network installs are getting old hat at this point, so I figured it’d be good to have around. The key to this being to take the pxeboot file, and rename it to pxeboot.0 (or openbsd.0) and choose this in the KERNEL line in the pxelinux.cfg/default file. This will try to boot /bsd.rd from the tftp server. It’s worth noting that I fell back on the i386 files over the amd64, as I was getting an error from pxelinux regarding the amd64 boot image.

Anyways, with openbsd 4.1 in hand I did the usual bridging configuration. I used one interface for management. I had sshd running on it and it had an IP, all configured during the install. The other two interfaces re0 and re1 I left alone during the install.

ifconfig bridge0 create
ifconfig re0 up
ifconfig re1 up
brconfig bridge0 add re0 add re1 up

I saw a ton of vlan traffic and wandered through the netgear gsm7324 config for a bit to clean things up. Once I was reaccquainted with their wierd vlan configuration, progress stopped. There was no ospf traffic going across the link (I had since connected re0 and re1 between the two devices). I could belive that the PIX might be filtering the ospf traffic, and I could believe I had misconfigured ospf on the gsm7324, so I spent a bunch of time tweaking these. Eventually I was out of ideas though, and I hadn’t seen any ospf traffic at all.

I decided to give the interfaces ip address and run tcpdump against them instead of against the bridge to look for the multicast ospf traffic and I immediately started seeing ospf traffic across the bridge.

I rebooted the openbsd box and reconfiguring the bridge. No ospf traffic. I checked net.inet.ip.forwarding and net.inet.ip.mforwarding which I was pretty sure had to do with routing and not briding, and verified their settings didn’t effect anything. I had spent a bit of time starting at the ifconfig output looking for any variance, and this time noticed that there was an inet6 line but not an inet line. “ifconfig interface inet up” did nothing so I ran “ifconfig interface inet6 ipv6address delete” and I started seeing the ospf multicast traffic.

Make whatever assumptions you want from that. Annoying, but ospf is up now, and I’m moving on.

front panel audo on asus a8n-e and a8n-sli (AC’97)

I around a bit getting audio working on a couple desktops here in the office. Most of the engineering workstations are Asus A8N-E or A8N-SLI boards. There’s a jumper block labeled FP_AUDIO on board for the front panel audio. You may have noticed in the past that some computers will disable the rear speaker output when you connect something to the front output, such as to automatically turn off the speakers when you plug in headphones. I find this nice. The catch is that this is usually done by routing the audio to the front panel and then back, using a mechanical headphone switch that allows the electrical path to continue back to the motherboard when there is no connector in the front panel, but opens the connection when you plug in.

There’s some decent specs here showing the connections. Basically, if you don’t have the right type of front panel audio connected, then your rear audio connector is disconnected. Alternatively you can jumper pins 9/10 and 5/6 to force audio back to the rear connector when not using a front panel. I have yet to see this done on any of my boards, but I get the impression that this is default.

cisco console cables for synaccess nc08

I inherited a Synaccess NC-08 serial console switch. It’s rack mountable, although only front mount. I did take the time a while back to drill new mounts so it would be rear mount.

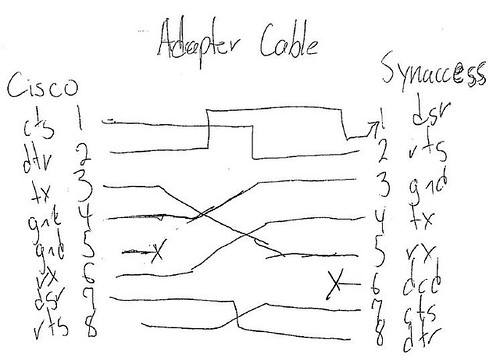
It came, I suppose, with a number of RJ-45 to DE-9 (DB9) Female adapters (see npman.pdf page 47). This is convenient as I plug this adapter into a serial console connector on a switch, and can use the existing patch cabling to color code and work the connection back to the rack the console switch is in. Unfortunately, Cisco had the same bright idea. I tried connecting their two RJ45-DE9 adapters together with a male-male gender changer but that didn’t work. I then tried putting a null modem cable in there as well, but that didn’t work either.

Giving up, I emailed synaccess support hoping they’d have an easy answer so I wouldn’t have to think about it. They called me back -right- away. I was shocked. I spent a lot of time trying to explain what I was trying to do though. The idea that I’d hook a switch to a serial device seemed to confuse them. I wonder what their normal customers use these for. They’re cheap I suppose, but I don’t figure they make a good scrambled egg or anything. They had no answer (about the cable, it’s possible it makes a scrambled egg still).

So I stared at the two pinouts for a while and drew up my own cable. Cisco seemed to ignore DCD in their console cable, so I did here hoping it would work. In the past I’ve seen DCD tied to DSR and I didn’t want to have to be splicing wires. I also dropped the second ground on the cisco side, figuring the two would be tied together in the cisco connector and that I didn’t have to worry too much about electrical physics in this small little cable. And aha! it works. Now if I could just buy six of these instead of having to make them.

Cisco to Synaccess rj45 adapter cable pinouts (for the search engines)
1 CTS : RTS 2
2 DTR : DSR 1
3 TXD : RXD 5
4 GND : GND 3
5 GND X DCD 6
6 RXD : TXD 4
7 DSR : DTR 8
8 RTS : CTS 7

hosting multiple domains with exchange

This was tough to find a concrete answer for. I don’t know why I didn’t just try it, although I was getting there. Once DNS (MX records) are all set up, and my smtp gateway was configured to forward a new domain, I was having trouble convincing exchange to use the new domain. There were plenty of examples where you add the domain to the default recipient policy in ESM. In course of doing this though, it was made clear to me by a popup that exchange wanted to give every user an email at this new domain if I checked the check box to enable it. I left the box empty, manually added an email at the new domain in ADUC, but got relay errors. I figured I could use a new recipient policy and a group with an ldap search filter to apply the new domains to those users who worked with that project, but I really only wanted one or two emails and they’d be special aliases anyways so I didn’t want to have another group kicking around.

I started to try this yesterday, but confirmation this morning when I did some more reading here that you can add recipient policies and apply no filter. This appears to have the correct effect of allowing me to use the domain, but recipient update services doesn’t try to do anything automatically on me.

It’s funny that I keep posting about exchange. I’ve been working with a lot of other cool software, but most of that makes sense as I learn it. It’s only been exchange where I’ve said “what the fuck?” and felt the frustration that leads to a post, hoping to shorten someone else’s googling.

GFI MailEssentials and NDR messages

I inherited GFI MailEssentials and MailSecurity recently.

I was troubleshooting a problem today where an SMTP sender was getting an NDR when emailing one of my users, but the exchange message tracking center claimed the message was delivered to the store.

Enter GFI MailEssentials, which optionally sends an NDR when it thinks something is spam. Here’s the fun catch though, it sends a 5.1.1 “email account does not exist”. In hopes of convincing the spammer the account doesn’t exist anymore? As if bulk mailers use legitimate return addresses.

It’s certainly not to inform the legitimate user their mail was rejected, as the NDR is a farce. It’s not signaling exchange to send an NDR, but rather taking these actions itself, so make sure logging is on. Fortunately there’s a template file in MailEssentials\templates called ndr.xml. Open it up in notepad, change the 5.1.1 references to 5.5.0 and put in your own custom anti-spam message instead of “this user does not exist”.

Not that this software should be sending NDRs. I’m sure I’m flooding the net with NDRs, but it looks like it’s hooking after the smtp service, not into or before. I’ll replace it with SA eventually.

Update 07/2007:
The NDR template just wasn’t working and GFI never replied the last time I sent them the requested tech support logs. I ran into an issue a couple of weeks ago where messages would go to GFI (sent to advanced queuing in Exchange System Manager) and never come back. Stopping GFI would get the messages back. I just deinstalled GFI and I’m replacing it with a traditional SpamAssassin installation.

forwarding email with microsoft exchange contacts

Also known as, where is /etc/aliases in exchange and why again is point and click “easier”…

I’ve seen a ton of howto’s on how to do this, and I wouldn’t say anything about this if they weren’t all so damn round about or not to the point.

This article has you creating a contact with the external email address, then using another user account to forward mail to that contact. The mentioned exchange 2000 and not exchange 2003, and I don’t want a user account kicking around as well, I just want an internal email address to forward to an external one.

Microsoft recommends something similar in kb 281926.

But for the sake of our sanity, let’s try something simpler.
1) In ADUC with ESM, right click, new, contact
2) Enter the names, next
3) set alias to the internal name. click modify, choose smtp, type the external address. next.
4) finish.
5) right click the contact. properties.
6) Exchange Advanced tab, click “hide from exchange address lists”
7) email address tab. the external address should be bold (primary) check that you have an email alias for all the domains you want (if your ad domain is not your email domain, add another smtp address)
8) done.